Showing posts with label diy crafts. Show all posts

October 3, 2014

DIY Creepy Halloween Mirror Wreath

Today was much better (anxiety wise) than yesterday.  My upset stomach continued until about 7pm, but really, others often have it so much worse.  Maybe we all ate the same lead paint chips when we were young.  Sheesh.  Sometimes I wish there were more defined causes to the onset of anxiety.


On another note, Halloween is fast approaching, and I have promised many a great diy holiday projects.  Meet the creepy wreath!  Appropriate for small kiddos, and older ones alike. The best part?  IT COST ME LESS THAN 4.00!!  Yay for a DIY project!

Here's how she went down:

GATHER:

the mirror (a serving platter from Dollar tree, which happens to be reflective)
a diaper (or ask for a free one from you neighbor with 4 kids.  She's bound to have one.)
Scraps of satiny emerald green fabric...from a dress your grandma made you when you were 12
    (thanks grandma!)
Scraps of black felt and old lace (optional)
2 fake plant stems from the dollar tree as well (any creepy stem with black fuzz on it works)
Raffia or straw
6-10 purple fuzzies or pom pom balls (optional)
12-15 black feathers (from a craft store - I already had these)
glue gun (are you a DIYer?  You already have this)
a scrap of white toole - or tole.  Why doesn't English spell like it sounds? (any mesh fabric will do.
    You only need like a 7x9" piece)

MAKE THE WITCHY FINGERS


This is the creepiest part of the mirror, and really just a feat of imagination.  This is also the coolest part, according to my kids.  They can't believe the scary fingers are really just diapers.

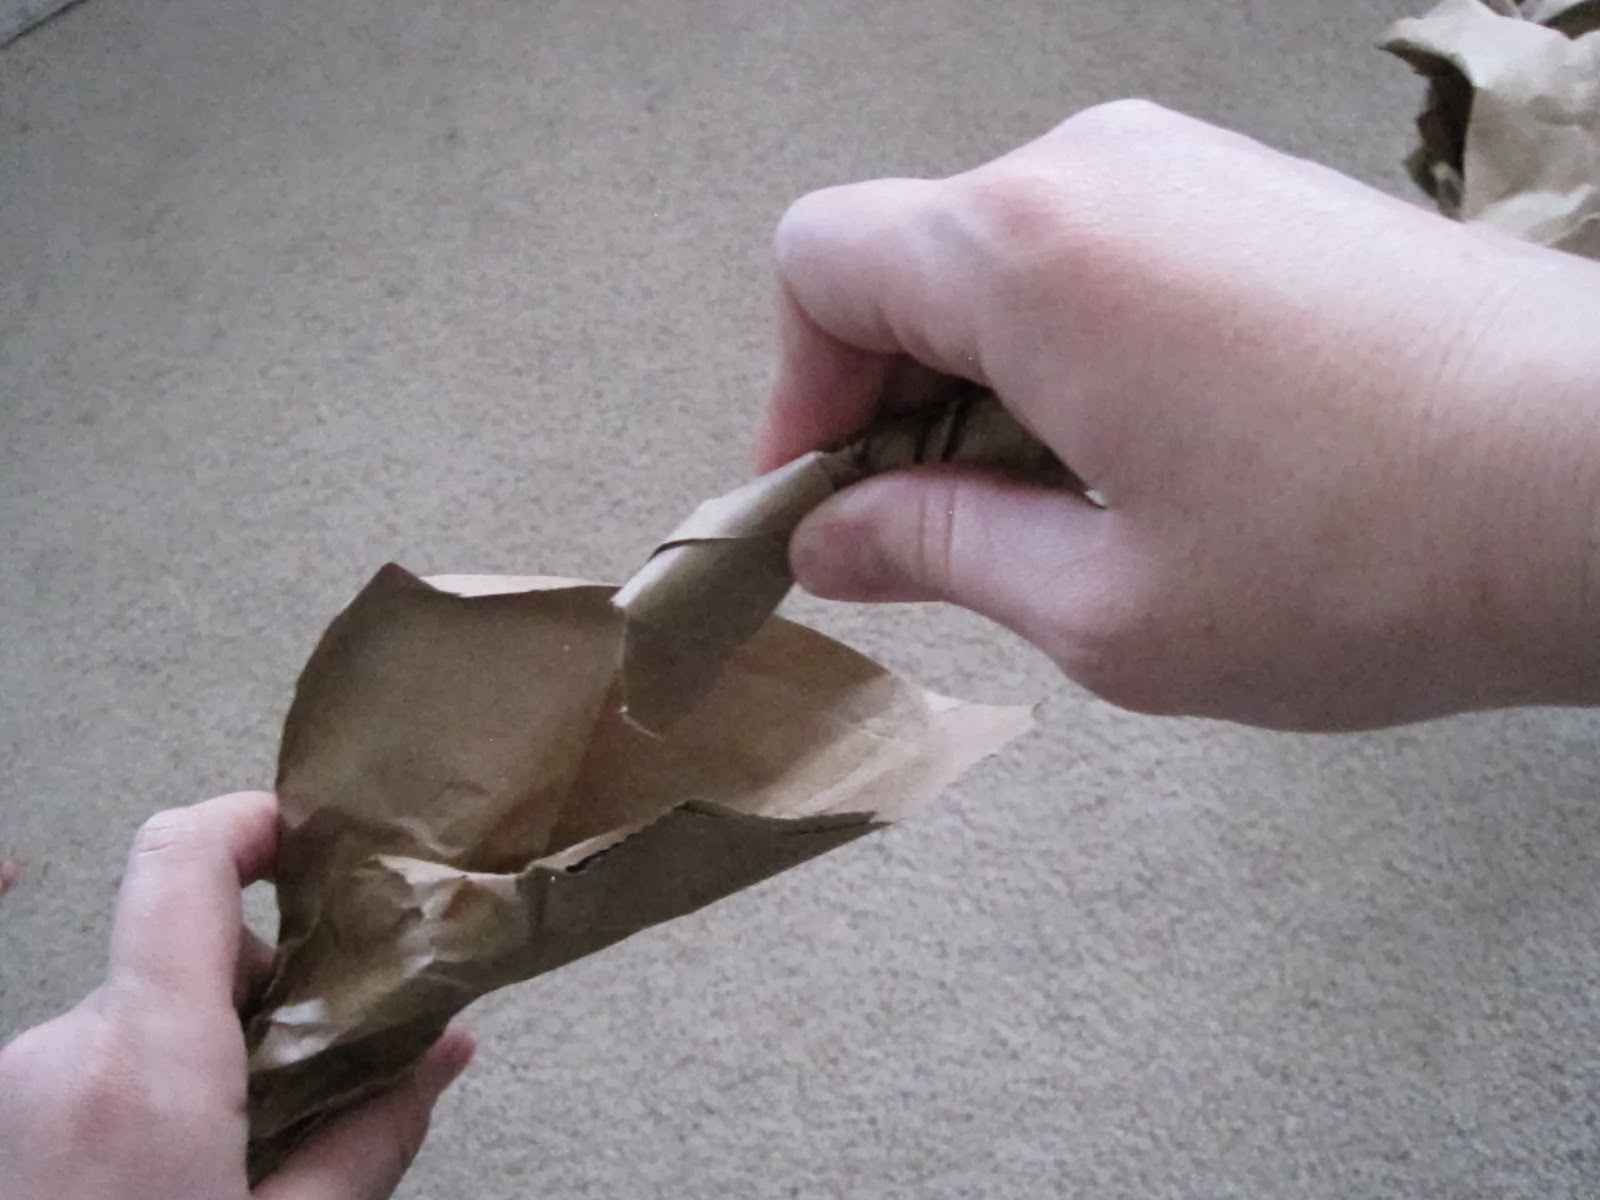
1. Get your diaper out, and cut 4 pieces of 1.5x3" strips.  The stuffing will want to come out,  I know.


2. Now you roll up your little strip length wise, and tape it 1/3 of the way up.  Bend the roll in half, and THEN tighten it on the un-taped section.  Once you've got it pretty tight, tape in place. Stay with me, I know this is weird.


3. You can tighten the tip even further and tape it again, making it pointy like the fingernail of a witch finger.  Depending upon how tightly you rolled each section, it should stay pretty bent and pointy!  It's ok if not.  Try it again, or accept that your fingers are arthritic and won't bend like they used to.


4.  Finally, wrap the whole thing in your shimmery green black fabric.  Use the glue gun to tack it down, and make sure to burn your fingers at least 6 times. Sacrifice makes it valuable :)  Cut out some raisin size fingernails from the black fabric and glue them on there.


5. Position all 4 fingers into the most natural look you can.  I recommend posing your own fingers and then modeling the diaper fingers after that.  Glue the unfinished bottoms to the back of the mirror, and then again at the lip of the front of the mirror.  Cut a strip of felt out to cover the back of fingers on the mirror and glue it down.  Cut out a piece of lace and glue it on the knuckles and on top of the black felt. Now it looks like a sleeve.

MAKE THE GHOST FACE


1. Get your piece of white mesh and fold it over itself.
2. Cut a tear drop shape out of both pieces, so that you get two ghost heads.
3. Fold one of the heads down by 1/3  (tip of the tear drop downward) and cut out some pointed oval
    length-wise slits for eyes.
4. Unfold.
5. Fold the whole head in half, and cut a long wavy mouth.  Now you have a screaming ghost.
6. Using spray adhesive (or the glue gun) tack down the screaming ghost to the mirror.
7. Bunch up the fabric of the uncut ghost head and tack it down the same way, but make it a little
    bunchy and irregular.  That gives it dimension.

BUNDLE THE STEMS


1. Get several pieces of raffia and wrap around the stems.  Keep going until you've wrapped up 3-4
    inches of the stem.
2. Tie a square knot.


3. Cut off the excess close to the knot, so it looks like broom ends.
4. Arrange branches to poke out and jut like a creepy tree.
5. Glue along the side of the mirror, and hold it there for a few seconds till it sets.

ADHERE THE FEATHERS


1. Arrange 12-15 black feathers along the bottom of the mirror
2. Glue the stems only in place, letting the tufts on top free to blow.
3. Enjoy that your mirror has no crow, just the remnants of one.
4. Glue on a few purple pom pom balls/fuzzies because your kids like to think they're spiders
    (optional)


tape on a wire to the back of your mirror with packing tape, and you are ready to hang!

You can add a 'boo' on there, or even write some creepy message in red/black sharpie if you want!  I'd love to know if you make one of these! Have fun and Happy Halloween!


August 2, 2014

DIY Screen Printing

I have never screen printed before this project, but with the low cost and great results, I would do this again and again.  Sheesh, I did do this again and again.  Here's how:


June 24, 2014

DIY embellished elastic hair ties


These gifties were made just a bit ago for the newest teenager in our family.  It was her birthday and she is very pleased to be 13.  She was so happy and kind to all of us.  I could tell she felt special, and I hope this little gift made her feel such.


Here's how to make them:

June 21, 2014

10 Must Do Activities to celebrate America

The 4th of July is my favorite holiday.  My dad is a vet, and I lived abroad for long enough to want to kiss the ground when I returned.  Truly I cannot tell you how thankful I am to live in this country, even with all it's ills.  I love other countries as well, but the USofA is home, and that is where my heart is!

So it makes sense that around here we get patriotic early on. Here are my best ideas for having a fantastic 4th!

1. Decorate your home, so all can see!
Even if I am dirt cheap, I can still afford to decorate for the 4th of Joo-lye.  
Try this:


I'm going for just the fire crackers, as I already have an old table that's busted up and needs re-purposing.  I love that there's an old red cooler out too, giving kudos to the picnic month.
Visit here to see how she up-cycles a wooden post for those firecrackers!

May 16, 2014

Owl rice bags with tutorial

We call these warmers "Owlies".  One night a few years back, in a desperate attempt to get my 4 kids to actually sleep when we put them to bed, I decided that a warm, fragrant buddy would help.  So I whipped up an owl shaped rice bag.  I figured owls are nocturnal, and we could tell our kids that they'll stay up watching for anything to happen, while the kids sleep.  And they did sleep!  Even my babies have responded beautifully, and are quiet within minutes of getting their warmed up Owlie.
 This is version 2, with a few improvements.


 To make these beauties, Download and print off this template.  

Trace them on fabric.  Cut each piece in different coordinating fabrics, if you want.  Use pinking shears, so the fabrics don't fray excessively.  Then lay the pieces out in front of you.


Begin pinning all of the pieces together, leaving the back of the owl aside until later.  
Sew the large eye circles on first, in a rounded stitch like I did, or a simple straight stitch.


Sewing the eyes will also catch the beak and the belly piece, so keeping them all tacked together won't be hard after this.


Now stitch over each eye pupil shape, and around the belly and beak.


Finally, sew up the front and back together, wrong sides touching.    Sew directly on top of the pieces of fabric you've already sewn on there.  It'll just reinforce them.   Be sure to leave a 3 inch gap open so you can add the rice!  I recommend sewing midway along the flat bottom to begin, that way you'll end off at the wing. 


Now get 2 Cups of rice per bag, and drop about 10 drops of fragrance oil into it.  We chose vanilla Spice, citrus grove, and lavender from Wal-Mart.  It was only 97 cents, and is the same stuff you'd put in a ceramic dish to diffuse.  Put only one scent in per bag, and beware they're really fragrant when you heat up the owlie, so don't put too much oil in!


Next, let your toddlers scoop the rice into a funnel that you're holding, with the owlie fabric stretched around it.


This is how it will look with the 2 C of scented rice added.


The Owl will be baggy enough that you can still scoot the rice over to one side of the bag and sew up the 3 inches of gap on your sewing machine.  Be sure to back stitch on the beginning and end of the 3 inches.


And now you have a cute little guy who smells nice and keeps the night watch while your sleeper sleeps.


My boys made sure that theirs had tools and gears on them so they were boy owlies.  So funny!


One happy buddy!  Enjoy!

April 11, 2014

What to do when your kids want a Wild Kratts party

Wild Kratts is an amazing show: 1. it's on PBS 2. It's educational and 3. It's imaginative.  Sold.  So I shouldn't have been surprised when my 4-to-be-5 year old requested a Wild Kratts party.  Really?  There is almost zero marketing for the show (it is PBS, afterall), and certainly doesn't have party themed napkins and such in stores.  Or so it was in Mar of 2012, when I did this.  I don't think they have any yet.  So it was time to get creative!

First, you follow these links for what printables there are out there:


See those button looking things?  Those are for creature power suits, which you can make. Yes you can.  Those buttons will need to be printed off and laminated (or covered with contact paper) to make this:
Here is a great link for those creature power discs if you don't have time or desires to edit the printables from PBS.com: 
 picasmixeduplife.blogspot.com
Print out those Discs, and laminate them by covering them with contact paper, or taking them to a copy shop.  Cut them out and apply a square of the itchy side of velcro to the back using a glue gun. Your creature power suit will have a piece of soft velcro in the middle of it, so it can be changed out with other discs.
For the Power suits:

I was wanting super simple, so I simple bought a remnant of black felt from my local JoAnn store, about 1 yard.  Using a T-shirt to give me some general bearings of the size that would fit my boy and his friends, I traced (with a white crayon) the T-shirt with the arms and bottom folded in.  Simple, and kind of a belly shirt, but it worked wonderfully.

Can you see the white crayon there?


Next you fold it in half to make sure that you're even-stevens on both sides:


When you're not, you trim it up and you get this:


Next you want to use various colors of felt to cut out terribly irregular thin rectangles.  You'll need six of each color:


 You're going to hot glue those onto the sides of your power suits.  
Three on each side between the armpits and bottom edge.

Also, remember that leftover soft square of velcro that we're putting on the suits to stick on the power discs?  Here's where it goes, though you probably don't need a diagram
.

You make each power suit it's own color.

 Next I used two pieces of ribbon (approx. 22 inches each) to make the back.  I simply hot glued the top of one ribbon to one shoulder, and the bottom of that same ribbon to the opposite side's edge (On the diagram, C goes to C and D goes to D).  Do the same thing for your second piece of ribbon, and they will make an 'X' for the back.  They were loose, and it was easy to put over the kids' noggins.

This is the under side:


Flip it over to the front, and try putting on a creature power disc.  
What a beauty!

For the food:
WE (kids included) made several 'animal kingdom' foods.  These bees were delicious (people raved about them)!  They include peanuts, but require no baking, so it was a complete go for us:

 tidy mom's no bake PB bees


Also we made these Lady bugs on a leaf:


These were incredibly easy and quick, as you simply 


1. Slice a baguette loaf
2. Spread cream cheese on each piece (I recommend Philadelphia garden vegetable cream cheese or Great Value chive & onion).  
3. Place a leaf of baby spinach on there
4. Slice a grape tomato lengthwise and put it on top.  
5. Use a toothpick to dot some dark blue gel color (as in food coloring or these (Gel food decorators) onto the backs so that they look like lady bugs.  
Easy peasy!

We also ate delicious animal cupcakes:
Again, these get my vote for easy.  
Crocodiles:
1. Make your favorite cupcakes 
2. pipe or spread blue colored frosting on top (I had blue sugar to sprinkle on top of the 'water', so i did) 
3. trim the curvy parts off of one half of a Nutter Butter with a sharp, thin knife, until it forms a pointed mouth of a crocodile.  Be sure to break half of them while you attempt it, so you can pacify the kids at your ankles asking to help.  
4. Heat some green dyed icing in a small bowl in the microwave (maybe 10-15 seconds) until it's runny, and dip the croc-nutter-butter in it. 
5.Turn over two white chocolate chips and put them on as eyes.  
6.Finally, melt about 10 chocolate chips in a small bowl the microwave (10 sec. intervals) and use a toothpick to dab 'pupils' onto the white eyeballs.

Hippos:
Follow steps 1&2 above, then
1. using half of a bare Nutter Butter, put it on your cupcake at a bit of an angle, so it looks like the head is higher than the nose.
2.Put 2 blue icing dots on the back of the Nutter Butter, at the top.  These will hold the ears, which are simply two Cheerios stuck to the icing.
3. Put 2 white chocolate chips on the front as 'eyes' with your icing.
4. Use a toothpick to put two blue 'pupils' on top of the eyes.
Super simple!

Bakerella also gave us these little guys for added variety:

Panda-cupcakes_3699


Spoonful.com also gave us this brilliant idea, which was delicious!
Snail Snack
I didn't make these, but they'd be excellent at this party!

I love that the fish have carrots and other veggies on there!  Tricky, tricky.

As for the decorations 
we made vines and hung them all over the backyard deck.  We were going for jungle themed out there, though you could pick any landscape you preferred.  Here's how:


First, get some brown paper bags next time you do your grocery shopping.  Bring them home, cut them down the middle of the side and pull apart the bottom, so you can open it up as shown:
Next, open up the bag and trace as shown here.  It's not important for them to be uniform thickness or any sort of perfect drawing.  It works with any sort of boxy 's'.

Cut that out on the lines, and then start grabbing and squeezing, twisting every now and then in the same direction.


It really helps if you have an excited boy with big muscles to help.


Continue squeezing and twisting until the length of paper is done.  To join it to another vine, 
leave the end slightly unwrapped, put in another wrapped end, and wrap tightly around it.


A cute baby inhibited by sleepiness is always helpful too.


Ta-Da!  Now you have long viney vines, to hang about and set the scene for jungle games.


Part 2 of Wild Kratts party is coming soon.  


UA-51076917-1