

Showing posts with label free printable. Show all posts
Showing posts with label free printable. Show all posts
May 9, 2020
Blooming Flowers Mothers Day Gift (Free Printable!)
Moms are softies. They love things that probably shouldn't be kept and especially sentimental thank you's. I have waaaay too many of them, and yet they continue to melt my heart. This printable is made for kids to cut, color and gift their mommas should they need a last minute gift (it's ok. If you're here printing one it means your a good giver). The cool part is that you can print them out, color them and then fold each petal into the center and they will really bloom! Put them in a small dish of water, and as the water absorbs through the paper the petals unfold before your eyes. It's as much fun for the kids as it is for the moms. Write a special message on the center of the flower if you want it to be even better. Enjoy!
July 27, 2014
Relief Society free Printable
I made this for my sweet sis in law who is teaching a lesson today in the women's class in our Church meetings. It's called Relief Society, and it's the largest organization in the world for women. All the lessons are taught by regular ladies who put a lot of prayer and study into their assigned topics.
I love being there, because I'm surrounded by other women of all ages who are trying to live lives faithful to Jesus Christ and his teachings. It's no simple task when what's popular is to follow your own way, and focus on yourself instead of serving others and putting your family above your personal interests/gain. (which I certainly struggle to do, even when I try hard!)
Here is a little printable that hopefully inspires you to keep on in your own efforts to keep your faith:
April 23, 2014
Old Man 30th Birthday Party
Also, on pinterest (at the time) there was a serious lack of funny 30 parties without being 'dirty' 'flirty' or going golfing and getting drunk. So this was was my best shot at it: an old man Dan party.
The Invites were sent out a month in advance, because my husband is a brilliant computer man and I couldn't mention it anywhere online. That makes it really hard to throw a surprise party without him finding out. I felt like I was an undercover operative, with all my secret messages via text and phone calls. But our friends/family loved getting a package via snail mail!

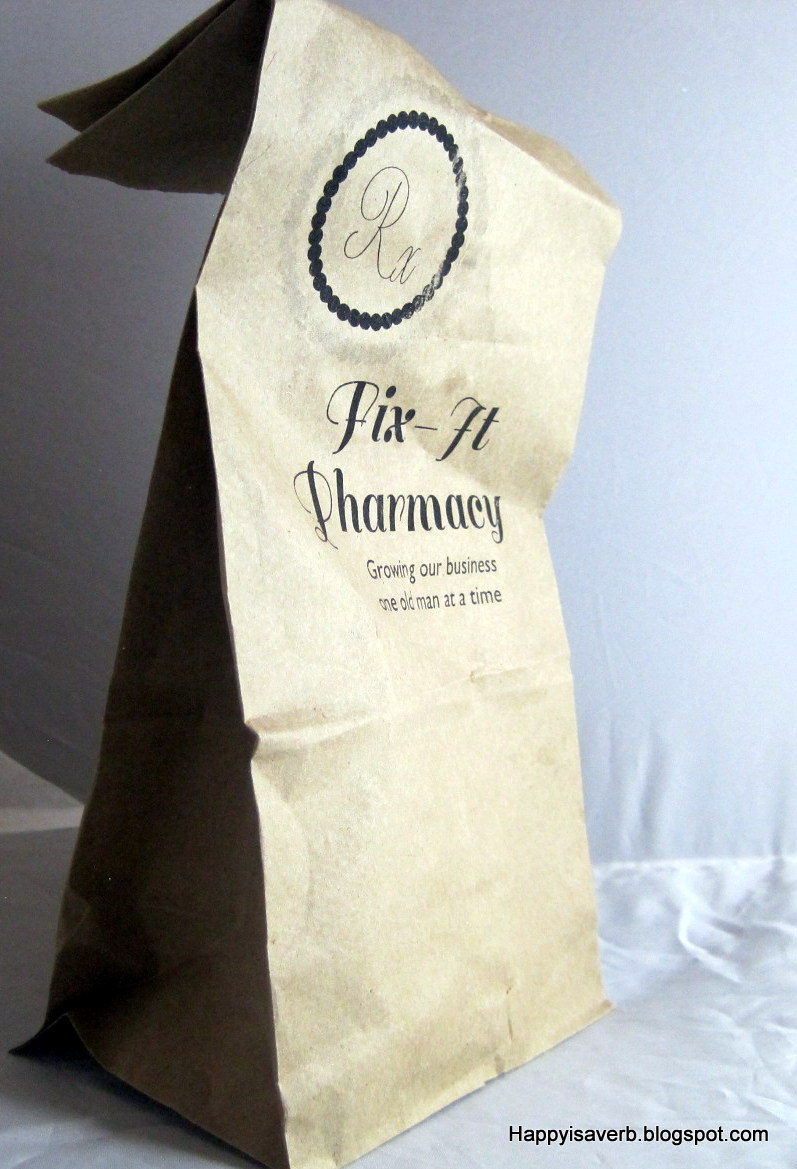
I wanted the invites to look like a pharmacy bag, so I made a graphic and printed it on brown lunch sacks. For more on how to print on a lunch sack, go here (my favorite tutorial) or here (also good).
To make this easier on you, here are a few images of the design for free! Don't sell them or anything with it on them, please. I made mine in B&W but you can print in color and they'd be even cuter.


Next I made a treat for each person on the invite. These are the simplest, and our friends LOVED them! Go to your local dollar store and look for these flat rectangular pill containers. I got all 7 for a dollar! I love that!
Since I took my inspiration from a tacky old couch, I chose shades of brown, orange and cream for this party. It made picking candies easy, too.
I filled the pill containers with Reese's Pieces candies, brown, orange and cream jelly bellies (conveniently together in the soda flavors pack). I threw in a few orange Tic Tac's and it looked like an assortment of pills.

I made a two sided invitation for the inside of the bag from a half sheet of cardstock. Since the bag is about 5, once printed I had to trim the margin slightly to fit this half sheet inside.

It's an EYE chart! Even better for the old man theme of it all.
You can make your own in Word by simply setting your margins to 'Narrow'. Set your text to size to 110 and type the first 4 or 5 letters of your message. Switch to 72 points for the next several letters, then to 60 and finally to 45pts. Your message should take up the whole page. Finally set the print settings to two pages per sheet and it will automatically re-size and center the images on a sheet of letter sized paper.
The back of the invite (which I printed before cutting in half) gave simple details about the party place and time, when to show up and where to park. It was a hoot to make.
Then I packed it all up, flattened it a little and taped down the top and bottom flaps of the bag. THat made the perfect place to stick an address 'to and from' label, which I did and I mailed it just like that. Make sure that your pill boxes on the inside are flat instead of stacked on top of each other, and you can mail it first class.
I made an 'old man Dan' banner for the decor, sorry about the pic. As you can see....It wasn't the focus of the picture. The wood paneling was a perfect compliment to this party, though very much not a compliment to daily life. More on that later.

and we used several of these:
This brilliant Etsy artist is the best priced for orders of 18-30 that I know of.

And for food, we color coordinated as much as we could, though we wern't sacrificing anything when it came to the good stuff. We had lil' smokies, mud dip (bean dip made by a friend, which was amazing) and chips, homemade bread rolls, sandwich fixings, brownies, all kinds of chocolate desserts, from dipped pretzels to malt balls and orange licorice. Drinks were so great as well, and the company was even better. I wish I could put pic.s up here of after we got going. The rooms were packed with huge laughs and great stories. But this was the best of all (sorry, it was a still shot from a video). Pure happy on his face.

April 18, 2014
15 ingenious DIY teacher gifts that will blow their socks off
I have told myself that I will find a way to thank my kids' teachers for one thing or another probably 6 times now. For things that were really important to me (like working with our boy on listening and obeying class rules better, and helping our daughter to establish confidence in academics). We have really great teachers. That translates to 'I wish I could buy you some lavish gift, but you're probably going to get the best gift 10 dollars can pay for'.


These brilliant DIY gifts will probably knock their socks off!

Darling note cards from Mommy by Day Crafter by Night
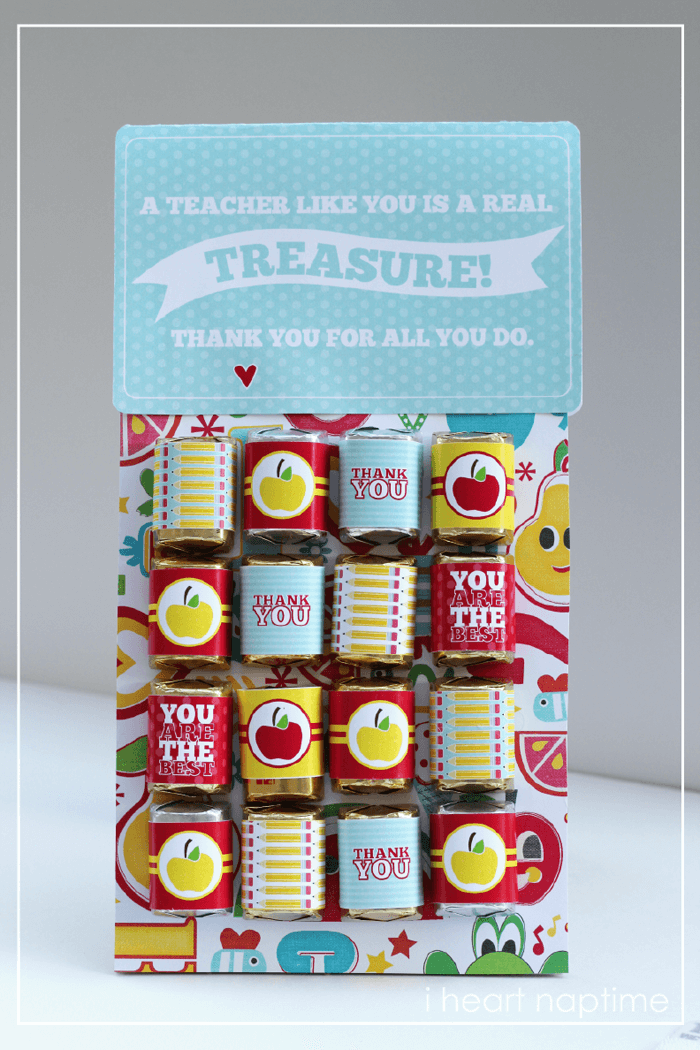
Genius 'App' card with chocolates. Free printable and tut at I heart Naptime

This lady makes the dollar store look like Tai Pan. By Passionate Penny Pincher
This treat is not only beautiful but exciting when you realize that it's an ice cream sundae kit! When I made mine, I simply went to my local grocery store and asked if I could buy a couple of their pastry boxes. They p0let me, and it turned out so cute. Visit A Pretty Cool Life for more.
Darling and low cost terra cotta apple stuffed with treats from 733 blog
Dr. Seuss mason jar made by The Country Chic Cottage
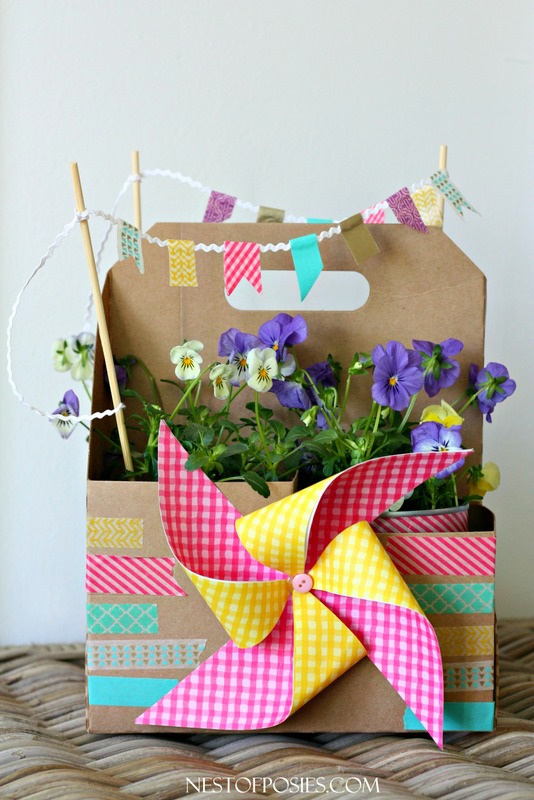
This gift is so creative and it upcycles! She uses a drink cartridge from Sonic and tin cans for those pansies. SO Brilliant!! From Nest of Posies
Darling way to give a gift card, and would be a great memory keeper of your kiddos for an excellent teacher. I also really liked that she had her kids write down their favorite things about class on the inside of these. From Come Together Kids
Beautiful free printable tags at Sweet Metel Moments
Also from her:
Darling gum gift with free printables also at Sweet Metel Moments
This is so brilliant, and I love that it goes with these adorable friend gifts for the end of the year:
Brilliance by Lisa Storms
I love the spray painted pups at the top! By Smashed Peas and Carrots

Darling and as she says, perfect for last minute teacher gifts. From Skip To My Lou
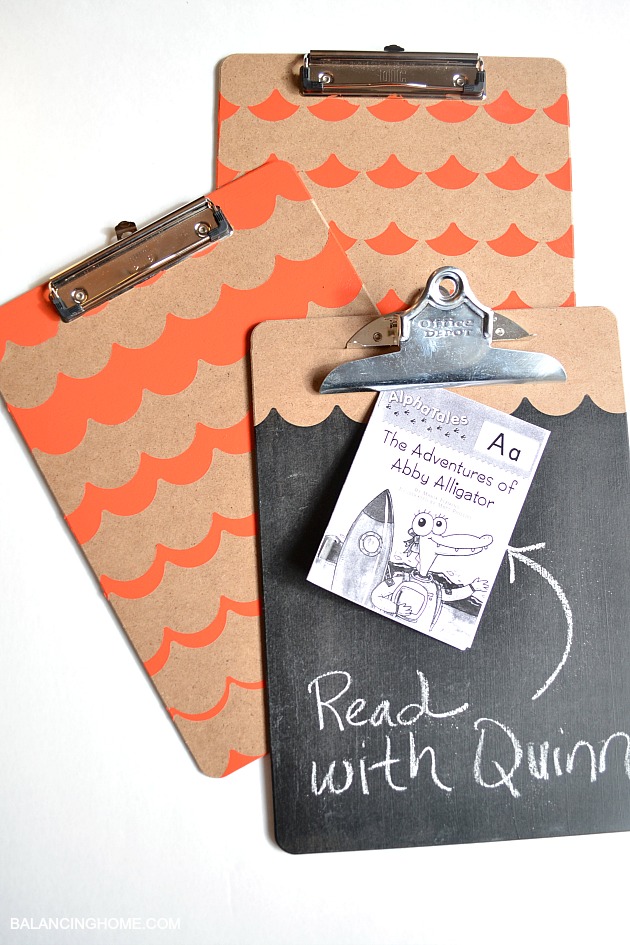
These chic beauties are also useful! By Balancing Home
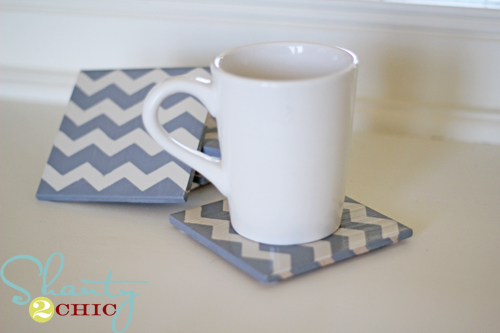
I love the simple design. It would be very easy to give these even if you weren't sure of the teacher's taste. By Shanty 2 Chic
Enjoy, and may your teachers be amazed by your goodness!
April 13, 2014
Words of Wisdom
In the General conference of the Church of Jesus Christ of Latter Day Saints, one of the first presidency, Elder Uchtdorf spoke about our eternal natures. I loved what he said so much that I wanted it on my wall! I'm a believer in what you surround yourself with influences your decisions, etc. so here is what I designed, free for your printing use in whatever format. Original is 8.5x11, 300dpi.
Enjoy!
![]()


Enjoy!
Also, just another one I made to keep me motivated, here's another freebie from that wonderful man!
April 11, 2014
What to do when your kids want a Wild Kratts party
Wild Kratts is an amazing show: 1. it's on PBS 2. It's educational and 3. It's imaginative. Sold. So I shouldn't have been surprised when my 4-to-be-5 year old requested a Wild Kratts party. Really? There is almost zero marketing for the show (it is PBS, afterall), and certainly doesn't have party themed napkins and such in stores. Or so it was in Mar of 2012, when I did this. I don't think they have any yet. So it was time to get creative!


First, you follow these links for what printables there are out there:

See those button looking things? Those are for creature power suits, which you can make. Yes you can. Those buttons will need to be printed off and laminated (or covered with contact paper) to make this:
Here is a great link for those creature power discs if you don't have time or desires to edit the printables from PBS.com:
Print out those Discs, and laminate them by covering them with contact paper, or taking them to a copy shop. Cut them out and apply a square of the itchy side of velcro to the back using a glue gun. Your creature power suit will have a piece of soft velcro in the middle of it, so it can be changed out with other discs.
For the Power suits:
I was wanting super simple, so I simple bought a remnant of black felt from my local JoAnn store, about 1 yard. Using a T-shirt to give me some general bearings of the size that would fit my boy and his friends, I traced (with a white crayon) the T-shirt with the arms and bottom folded in. Simple, and kind of a belly shirt, but it worked wonderfully.

Can you see the white crayon there?

Next you fold it in half to make sure that you're even-stevens on both sides:

When you're not, you trim it up and you get this:

Next you want to use various colors of felt to cut out terribly irregular thin rectangles. You'll need six of each color:

You're going to hot glue those onto the sides of your power suits.
Three on each side between the armpits and bottom edge.
Also, remember that leftover soft square of velcro that we're putting on the suits to stick on the power discs? Here's where it goes, though you probably don't need a diagram
.

You make each power suit it's own color.
Next I used two pieces of ribbon (approx. 22 inches each) to make the back. I simply hot glued the top of one ribbon to one shoulder, and the bottom of that same ribbon to the opposite side's edge (On the diagram, C goes to C and D goes to D). Do the same thing for your second piece of ribbon, and they will make an 'X' for the back. They were loose, and it was easy to put over the kids' noggins.
This is the under side:

Flip it over to the front, and try putting on a creature power disc.
What a beauty!
For the food:
WE (kids included) made several 'animal kingdom' foods. These bees were delicious (people raved about them)! They include peanuts, but require no baking, so it was a complete go for us:
Also we made these Lady bugs on a leaf:

These were incredibly easy and quick, as you simply

1. Slice a baguette loaf
2. Spread cream cheese on each piece (I recommend Philadelphia garden vegetable cream cheese or Great Value chive & onion).
3. Place a leaf of baby spinach on there
4. Slice a grape tomato lengthwise and put it on top.
5. Use a toothpick to dot some dark blue gel color (as in food coloring or these (Gel food decorators) onto the backs so that they look like lady bugs.
Easy peasy!
We also ate delicious animal cupcakes:

Again, these get my vote for easy.
Crocodiles:
1. Make your favorite cupcakes
2. pipe or spread blue colored frosting on top (I had blue sugar to sprinkle on top of the 'water', so i did)
3. trim the curvy parts off of one half of a Nutter Butter with a sharp, thin knife, until it forms a pointed mouth of a crocodile. Be sure to break half of them while you attempt it, so you can pacify the kids at your ankles asking to help.
4. Heat some green dyed icing in a small bowl in the microwave (maybe 10-15 seconds) until it's runny, and dip the croc-nutter-butter in it.
5.Turn over two white chocolate chips and put them on as eyes.
6.Finally, melt about 10 chocolate chips in a small bowl the microwave (10 sec. intervals) and use a toothpick to dab 'pupils' onto the white eyeballs.
Hippos:
Follow steps 1&2 above, then
1. using half of a bare Nutter Butter, put it on your cupcake at a bit of an angle, so it looks like the head is higher than the nose.
2.Put 2 blue icing dots on the back of the Nutter Butter, at the top. These will hold the ears, which are simply two Cheerios stuck to the icing.
3. Put 2 white chocolate chips on the front as 'eyes' with your icing.
4. Use a toothpick to put two blue 'pupils' on top of the eyes.
Super simple!
Bakerella also gave us these little guys for added variety:
Spoonful.com also gave us this brilliant idea, which was delicious!
I didn't make these, but they'd be excellent at this party!
I love that the fish have carrots and other veggies on there! Tricky, tricky.
As for the decorations
we made vines and hung them all over the backyard deck. We were going for jungle themed out there, though you could pick any landscape you preferred. Here's how:
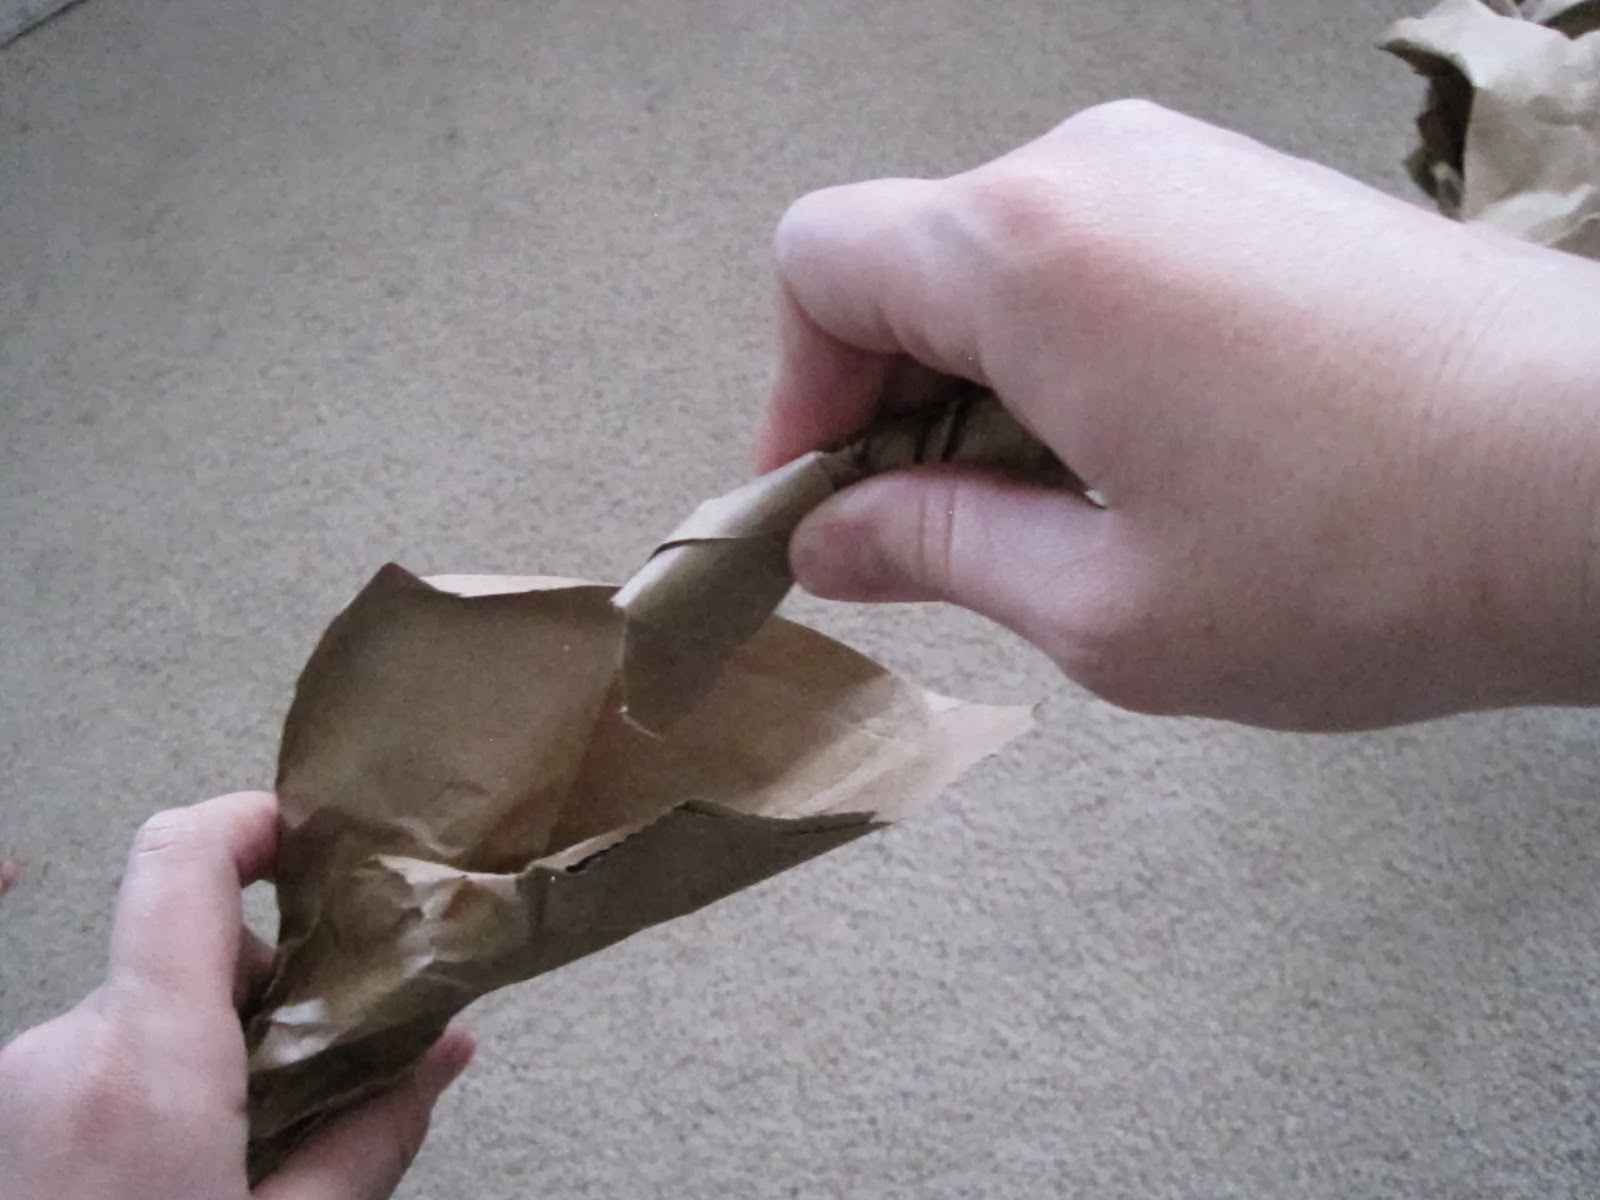
First, get some brown paper bags next time you do your grocery shopping. Bring them home, cut them down the middle of the side and pull apart the bottom, so you can open it up as shown:


Next, open up the bag and trace as shown here. It's not important for them to be uniform thickness or any sort of perfect drawing. It works with any sort of boxy 's'.

Cut that out on the lines, and then start grabbing and squeezing, twisting every now and then in the same direction.

It really helps if you have an excited boy with big muscles to help.


Continue squeezing and twisting until the length of paper is done. To join it to another vine,
leave the end slightly unwrapped, put in another wrapped end, and wrap tightly around it.

A cute baby inhibited by sleepiness is always helpful too.

Ta-Da! Now you have long viney vines, to hang about and set the scene for jungle games.

Part 2 of Wild Kratts party is coming soon.
Subscribe to:
Posts (Atom)